
Setting up your own private nameservers on cPanel server has many of the advantages, in particular enabling the majority of cPanel’s built-in DNS tools which can roll out DNS changes much simpler.
This article will show to you best practices to set up and to register new private nameservers on a cPanel server utilizing the WHM (Web Host Manager) interface.
Most of the customers will need to utilize a domain name they officially own, frequently the same domain name that is being utilized for the hostname of the server that will be running the private nameservers.
For this sample, we will utilize a domain called example.com. Our server is called host.example1.com and we will be setting up below nameservers,
ns1.example.com and
ns2.example.com.
There are three sections to set your private nameservers: Configuring the server to acknowledge and prepare the DNS asks for, registering your new nameservers at the registrar center who controls the domain name, lastly directing domains at those new nameservers.
Step 1: Configuring the Server
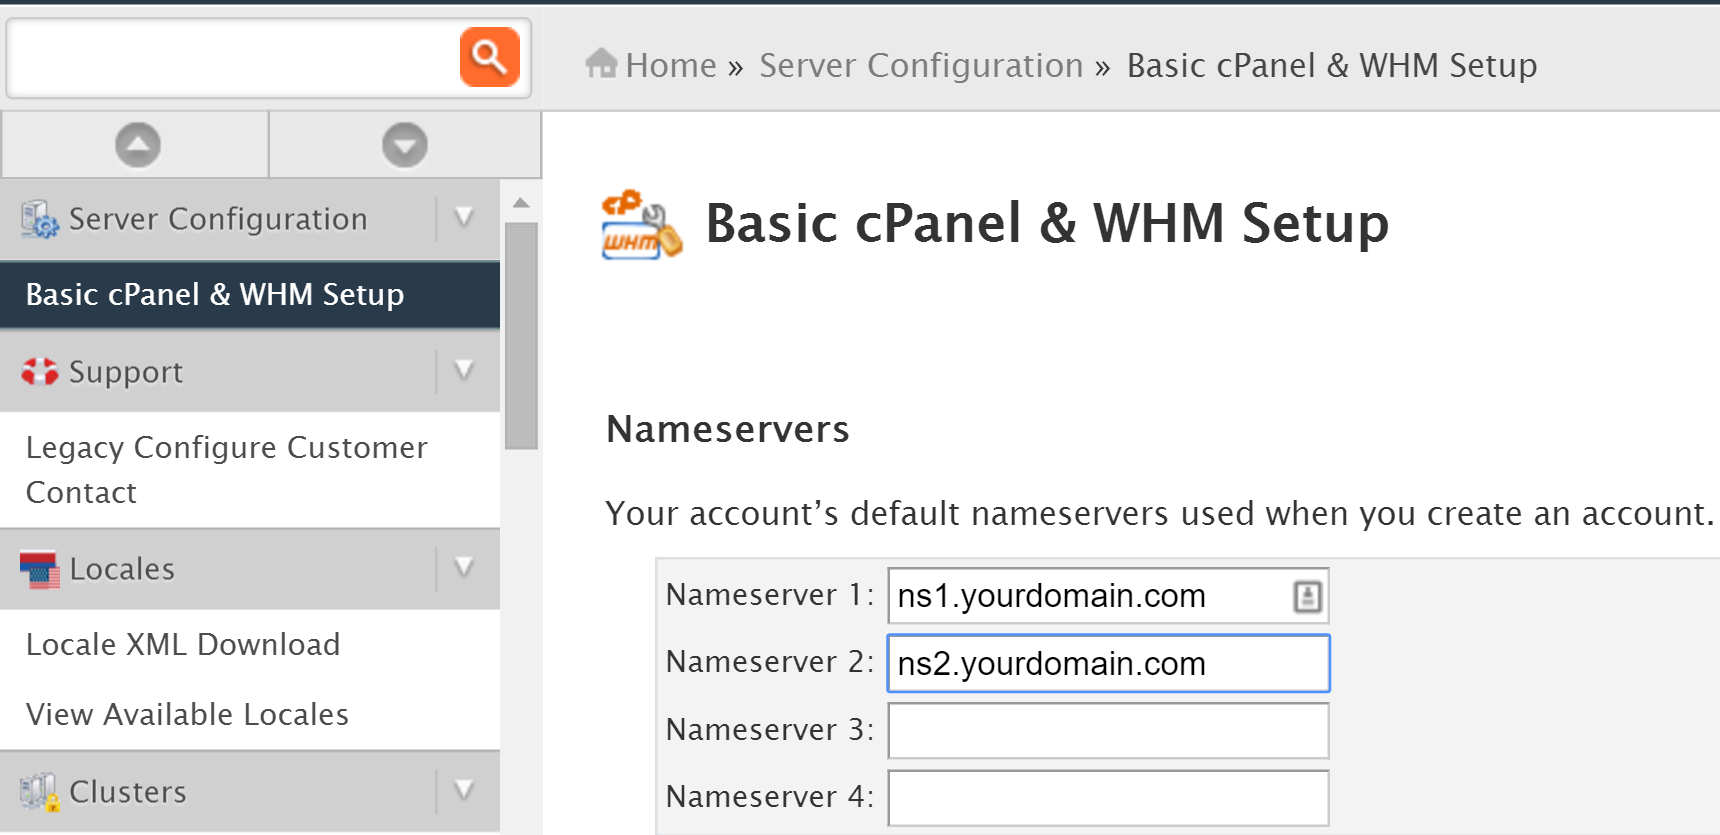
Sign into your server’s WHM interface and then find out the navigation section which is on the left called Basic cPanel and WHM Setup, under Server Configuration. This is the primary thing on the left route bar.
At the end, you will find out the Nameservers section.
Look at the WHM Nameserver Setup below,
Whenever you lock this screen, you may see that two nameservers, utilizing the same domain name as the server’s hostname, are now set up.
If so skip to Step 2: Registering Your Private Nameservers.
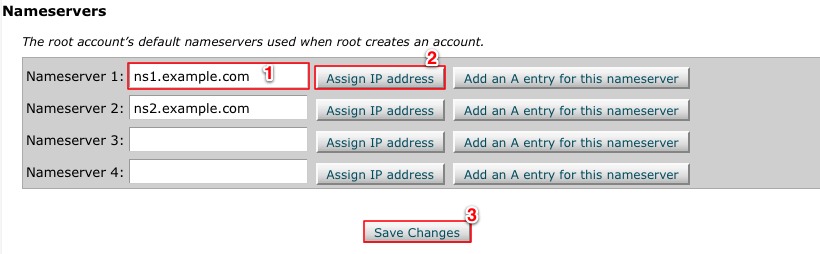
If there are no nameservers recorded here then we should make them. Sort the name of the nameserver you wish to set up in the content box (1) and then click on the Assign IP Address bitton(2).
You will be come back to the same screen now demonstrating your new nameserver and the IP it has been doled out. You need no less than two nameserver names arranged, so rehash this progression to make your second nameserver.
When you are done doling out IP addresses, make a point to click on the Save Changes button(3).
Note: Editing Nameserver IPs by means of SSH,
cPanel stores the nameserver IP assignments in a record located at:
/var/cpanel/nameserverips.yaml
If you sign into your server utilizing SSH it is possible to alter this file by hand and have cPanel utilize your new settings.
root@host [/]# cat /var/cpanel/nameserverips.yaml—ns1.example.com: 72.52.129.244: 1 count: ‘4’ zones: example.com,domain.com,ns1.example.com,ns2.example.comns2.example.com 72.52.129.245: 1 count: ‘4’ zones: example.com,domain.com,ns1.example.com,ns2.example.com
In the above sample we are utilizing the cat command to show the content of the file. Changes can be made to this file utilizing your shell word processor, for example, vim, nano, or whatever you are open to utilizing. Before altering the nameserverips.yaml file, you should erase the following cache file:
root@host [/]# rm/var/cpanel/nameserverips.cache
cPanel will revamp that document after you have rolled out your improvements.
As usual, Liquid Web support prescribes you makes a backup of any documents you change by hand utilizing SSH before you alter them!
A basic backup command:
root@host [/]# cp/var/cpanel/nameserverips.yaml/var/cpanel/nameserverips.yaml.bak
Presently you can change the record as much as you need, and if anything truly terrible happens you can basically erase the document and rename your .bak duplicate to the first document name.
Note: If you change your current nameserver IP assignments you should update the assignments at the registrar!
Step 2: Registering Your Private Nameservers
Most by far of registrar centers don’t charge their clients any additional expense for enrolling nameservers the length of the primary domain name itself has as of now been acquired.
On the off chance that you enrolled the domain yourself:
On the off chance that you are setting up nameservers for a domain name that you claim, which you likewise acquired yourself at a domain registrar, you should login to your account at that same registrar center and utilize their tools to enlist the new names.
For instance, on the off chance that you are setting up ns1.testdomain.com and ns2.testdomain.com, and you obtained testdomain.com from GoDaddy, you would need to login to your GoDaddy account with a specific end goal to enroll the new nameservers.
When you have found the device/page you require at your enlistment center’s site the enrollment itself is exceptionally clear. Most enlistment centers utilize a basic structure where you enter for the sake of the nameserver you wish to make and the comparing IP address (that we got from the strides depicted previously).
In the event that Liquid Web enrolled the domain for you:
In the event that you are setting up nameservers for an area and the domain was obtained as a piece of your Liquid Web account you should open another help work area ticket with your solicitation utilizing either your oversee login or by messaging support@liquidweb.com.
You are welcome to take after the steps portrayed above to finish the server plan and have us handle the nameserver enrollment, or on the off chance that you might want our Heroic Support administrators will be cheerful to help you with the whole process.
Step 3: Pointing Your Domain(s) at Your New Nameservers
The last step in making your own nameservers is to begin utilizing them by effectively directing your domain(s). Sign into your enlistment center and alter the doled out nameservers so that it now focuses at your new nameserver names.
If it’s not too much trouble take note of that on the off chance that you change an area’s nameservers the domain will briefly quit working while the new settings spread all through the whole web. On the off chance that downtime is a basic issue for your domain we prescribe you make this amid a weekend or late around evening time when activity is prone to be low.
Since your domain is indicating at your server’s nameservers you can utilize the DNS tools in the WHM and cPanel interfaces change your zone files!